👇それでは下記の記事の続きをやっていこう!
前回までは”エラー(Error)と例外処理(Exception)”について学習してきました。
今回は、Pythonのファイルの入出力(File I/O)処理について触れてみたいと思います。
CSVファイル等のデータ処理ができるようになるとやれる幅も広がってくると思いますので、学習していこう🤓
Contents
open関数とwith statement
open関数
✅ ビルトインファンクッションであるopen()を使って該当ファイルを開く
✅open()関数を使うことでファイルにアクセスすることが出来る
✅open()関数で開いたデータはメモリを使ってしまっているので、必ずclose()関数で閉じる
|
1 2 3 4 5 6 7 8 |
f = open("python_wiki.txt") # txtはpython.org公式のpython wikiページの文をコピペしたもの(ただのtxtファイル) # try, finallyを使うことで、データ処理が終わったら必ずopenしたデータをcloseしてあげる try: # for文で行ごとにデータを取得していく for line in f: print(line, end='') # printオブジェクトはデフォルトで改行(\n)が入っているため、それを外す finally: f.close() |
with statement
✅ try, finally構文を使わなくてもopen()関数で開いたデータは、自動的にclose()関数が実行する
✅ データ処理を行う際にデータを開くときは、必ずこの書き方になるので覚えてしまおう
|
1 2 3 4 5 |
を# with statementを使うことで⬆︎上記を簡潔に書くことが出来る # コードが終了すると自動的にcloseしてくれる with open("python_wiki.txt") as f: for line in f: print(line, end='') |
ファイルの読み込み(read)
✅ for文でループで回すことで各行を取得することが出来る
✅ .read():ファイルの中身全てを一つのstringとして読み込む
⚠️ファイルが大きい場合は実行しないように注意(ファイルの中身を一括で取得するため)
✅ .readline():一行ずつ取得しstringで返す(while文で回し取得する)
✅ .readlines():全ての行をlist型で返す
|
1 2 3 4 5 6 7 8 9 10 11 12 13 14 15 16 17 18 19 20 21 22 23 |
# ファイルを読み込む方法 # for文でループで回す with open("python_wiki.txt") as f: for line in f: print(line, end='') # .read()でファイルの中身の全てを一つのstringとして返す # ⚠️ファイルが大きい場合は実行しないように注意(ファイルの中身を一括で取得するため) with open("python_wiki.txt") as f: print(f.read()) # .readline()で一行ずつ取得しstringで返す with open("python_wiki.txt") as f: line = f.readline() while line: print(line, end="") line = f.readline() # .readlines()で全ての行をlistで返す with open("python_wiki.txt") as f: lines = f.readlines() print(lines) # ['The Python Wiki\n', 'Welcome to the Python Wiki, a user-editable compendium of knowledge based... |
ファイルの書き込み(write)
✅ open()関数の引数にmode=”w”と指定することで書き込みモードで開くことが出来る(デフォルトはmode=”r”,”t” : 読み込みモード)
✅⬆︎この方法は上書きされるので注意⚠️(追加の書き込み方法は後述する)
✅ .write()関数で書き込みを実行する
|
1 2 3 4 |
# ファイルへ書き込む方法 # この方法は上書きされる #追加で書き込みは後述する with open("writing_file.txt", mode="w") as f: # writing_file.txtというファイルは存在しないが、open()関数が自動で作ってくれる f.write("You can write contents here\nuse 'bsckslash to break the row") |
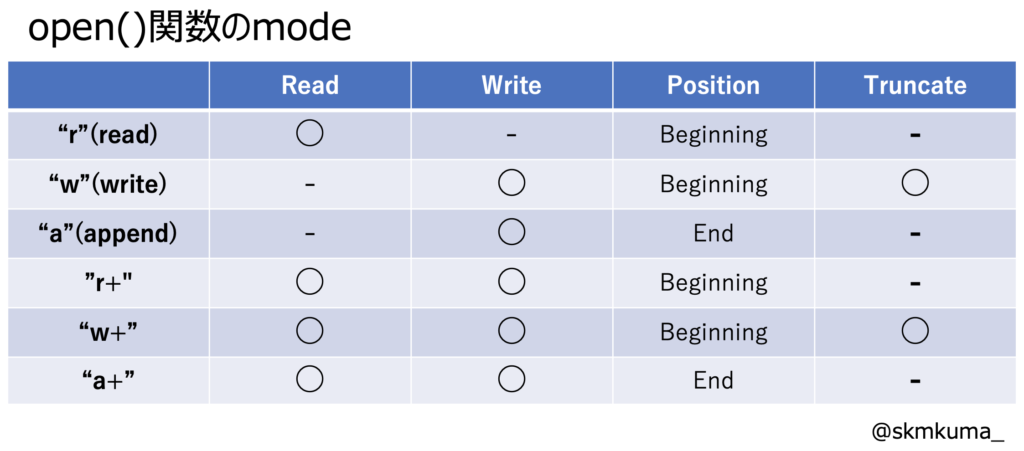
modeの引数
✅mode=”a” : ファイルの最後尾に内容を書き込み可
✅mode=”r+” : 読み書き両方可能
✅mode=”w+” : 読み書き両方可能(⚠️上書きされるので注意)
✅mode=”a+” : 読み書き両方可能 + positionが最後尾から始まる(上書きされない)
seek(0) : positionをファイルの先頭に移動する (ex. f.seek(0))
|
1 2 3 4 5 6 7 8 9 10 11 12 13 14 15 16 17 18 19 20 21 22 |
# mode='a'(append): ファイルの最後尾に内容を書き込み可 with open("writing_file.txt", mode='a') as f: f.write("mode=a appends text") # mode='r+': 読み書き両方可 with open("writing_file.txt", mode='r+') as f: f.write("You can write and read with r+ mode") print(f.read()) # You can write and read with r+ mode # mode='w+': 読み書き両方可 上書き(truncated)されることに注意 with open("writing_file.txt", mode="w+") as f: f.write("You can write and read with w+ mode") # seek(0): カーソルをファイルの先頭に移動 f.seek(0) print(f.read()) # mode='a+' : 読み書き両方可能 + positionが最後尾から始まる(上書きされない) with open("writing_file.txt", mode='a+') as f: f.write("\nYou add sentences to the last of the file content with a+ mode") f.seek(0) print(f.read()) |
csvファイル
✅ CSV : comma separated values. カンマ区切りでデータを保持するフォーマット(拡張子: .csv)
✅ csvモジュールを使いアクセス
✅ カンマ以外にもtab, 『:』, 『;』で区切ることが出来る(区切り文字のことをdelimiterと呼ぶ)
csv.reader(<filename>) : list型で取得
csv.DictReader(<filename>) : dictionary型で取得
csv.writer(<filename>) : list型で書き込み
csv.Dictwriter(<filename>) : dictionary型で書き込み
|
1 2 3 4 5 6 7 8 9 |
<example.csv> ,First Name,Last Name,Gender,Country,Age,Date,Id 1,Dulce,Abril,Female,United States,32,15/10/2017,1562 2,Mara,Hashimoto,Female,Great Britain,25,16/08/2016,1582 3,Philip,Gent,Male,France,36,21/05/2015,2587 4,Kathleen,Hanner,Female,United States,25,15/10/2017,3549 5,Nereida,Magwood,Female,United States,58,16/08/2016,2468 6,Gaston,Brumm,Male,United States,24,21/05/2015,2554 7,Etta,Hurn,Female,Great Britain,56,15/10/2017,3598 |
|
1 2 3 4 5 6 7 8 9 10 11 12 13 14 15 16 17 18 19 20 21 22 23 24 25 26 27 28 29 |
import csv # csv.reader():list型で取得 with open("example.csv") as f: reader = csv.reader(f) # reader変数に格納された各行をlist型で取得する for line in reader: print(line) # ['', 'First Name', 'Last Name', 'Gender', 'Country', 'Age', 'Date', 'Id'].... print(line[1]) # First Name Dulce MaraPhilip Kathleen Nereida Gaston Etta # csv.DictReader():dictionary型で取得 with open("example.csv") as f: reader = csv.DictReader(f) for line in reader: print(line) # {'': '1', 'First Name': 'Dulce', 'Last Name': 'Abril', 'Gender': 'Female', 'Country': 'United States', 'Age': '32', 'Date': '15/10/2017', 'Id': '1562'}... print(line['Country']) # United States Great Britain France United States United States United States Great Britain # csv.writer():list型で書き込み with open('sample.csv', mode='w') as f: writer = csv.writer(f) writer.writerow(['value1', 'value2']) writer.writerow(['value3', 'value4']) # csv.Dictwriter():dictionary型で書き込み with open('sample.csv', mode='w') as f: writer = csv.DictWriter(f, ['col1', 'col2']) writer.writeheader() # ヘッダーを記入 writer.writerow({'col1':'value1', 'col2':'value2'}) writer.writerow({'col1':'value3', 'col2':'value4'}) |
👇 csv.Dictwriter()で書き込んだ結果
|
1 2 3 4 |
<sample.csv> col1,col2 value1,value2 value3,value4 |
jsonファイル
✅ JSON: javascript object notation. Webでのデータ送受信によく使われる(拡張子: .json)
✅ jsonモジュールを使う
✅ jsonファイルにはタプル型の概念はないので、リスト型に変換される
json.load(<jsonfile>) : jsonファイルをpythonのデータ構造(dictionary型)で読み込み
json.dump(<dictionary>, <jsonfile>) : pythonのデータ構造(dictionary型)をjsonファイルに書き込み
json.loads(<dictionary>) : json文字列をpythonのデータ構造(dictionary型)に変換
json.dumps(<dictionary>) : pythonのデータ構造(dictionary型)をjson文字列に変換
👇example.jsonへの出力方法(読み取り)
|
1 2 3 4 5 6 7 8 9 10 11 12 13 14 15 16 17 18 19 20 21 22 23 |
<example.json> { "glossary": { "title": "example glossary", "GlossDiv": { "title": "S", "GlossList": { "GlossEntry": { "ID": "SGML", "SortAs": "SGML", "GlossTerm": "Standard Generalized Markup Language", "Acronym": "SGML", "Abbrev": "ISO 8879:1986", "GlossDef": { "para": "A meta-markup language, used to create markup languages such as DocBook.", "GlossSeeAlso": ["GML", "XML"] }, "GlossSee": "markup" } } } } } |
|
1 2 3 4 5 6 7 8 |
# example.jsonへのアクセス import json with open("example.json") as f: data = json.load(f) print(type(data)) # <class 'dict'> print(data['glossary']['GlossDiv']['GlossList']['GlossEntry']) #dictionaryにアクセス |
👇example.jsonへの入力方法(書き込み)
|
1 2 3 4 5 6 7 8 9 10 11 12 13 14 15 16 17 18 19 20 21 |
# jsonファイルへの書き込み new_json = {'key1': 'value1', 'key2': (1, 'value2')} with open('new_json.json', 'w') as f: # jsonファイルにはタプル型の概念はないので、リスト型に変換される json.dump(new_json, f) # {"key1": "value1", "key2": [1, "value2"]} # 作成したnew_json.jsonファイルの読み込み with open('new_json.json', 'r') as f: new_json_reload = json.load(f) print(type(new_json_reload)) # <class 'dict'> print(new_json_reload) # {'key1': 'value1', 'key2': [1, 'value2']} # dictionary型→jsonの文字列に変換 json_str = json.dumps(new_json) print(type(json_str)) # <class 'str'> print(json_str) # {"key1": "value1", "key2": [1, "value2"]} # jsonの文字列→dictionary型 dict_data = json.loads(json_str) print(type(dict_data)) # <class 'dict'> print(dict_data) # {'key1': 'value1', 'key2': [1, 'value2']} |
以上で、”File I/Oについて”は終了です、いかがだったでしょうか?
次回は”pythonコードのテスト”について学んでいきます。
個人orチームで実装・開発したコードがある一定の品質を保っているのかを確認する大事な作業になります。テストエンジニアではない人でも、一度は勉強する価値があると思いますので、学習していきましょう!
今回はこの辺で、バイバイ👋







with open(“<datafile>”) as <変数名f> : <datafile>を<変数名f>に格納し開く